
The Concept of Multi-Head Attention Mechanism and Its Implementation In Pytorch

In this post, we will discuss building a multi-head attention layer in a Transorfmer, which is a more advanced variant of the attention layer that has proven to be very effective in practice. Moreover, we will show you how to implement such Layer using Pytorch.

 Building a Multi-Head Attention Layer in a Transformer

The Transformer is a powerful neural network architecture that has achieved state-of-the-art performance on a variety of natural language processing tasks. One key component of the Transformer is the attention layer, which allows the model to focus on specific parts of the input while processing it. 

The Attention Mechanism

At a high level, the attention mechanism works by allowing the model to "pay attention" to different parts of the input while processing it. This is done by first projecting the input and key-value pairs using linear transformations, and then computing the attention weights using a dot product between the projected input and the keys. These attention weights are then used to weight the value vectors, which are then summed to produce the output of the attention layer.
Formally, given input vectors $X = {x_1, x_2, ..., x_n}$, key-value pairs $K = {k_1, k_2, ..., k_n}$, and value vectors $V = {v_1, v_2, ..., v_n}$, the attention layer computes the output Y as follows: 
$$Y = \sum_{i=1}^{n} a_i v_i$$

where the attention weights a_i are computed as:
$a_i = \frac{\exp(x_i \cdot k_i)}{\sum_{j=1}^{n} \exp(x_j \cdot k_j)}$
This attention mechanism is known as "dot-product attention".

Multihead Attention

While the attention mechanism described above is effective, it has a few limitations. One limitation is that it only allows the model to attend to a single part of the input at a time. This can be limiting, as there may be multiple important parts of the input that the model needs to consider simultaneously.
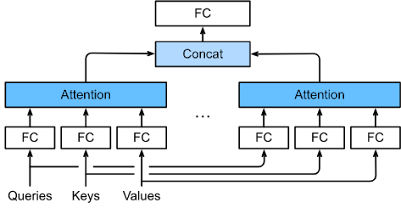
To address this issue, we can use the concept of "multi-head attention". In multi-head attention, we project the input, key, and value vectors multiple times using different linear transformations, and then compute multiple attention weights using these projected vectors. These attention weights are then concatenated and once again projected using a linear transformation to produce the final output of the attention layer.
Formally, given input vectors $X$, key-value pairs $K$, and value vectors  $V$, the multi-head attention layer computes the output Y as follows:
$W_o$, $W_{i,Q}$, $W_{i,K}$, and $W_{i,V}$
where $head_i$ is the output of the attention mechanism applied to the projected input, keys, and values:
$head_i = Attention(XW_{i,Q}, KW_{i,K}, VW_{i,V})$
and $W_o$, $W_{i,Q}$, $W_{i,K}$, and $W_{i,V}$, are learned linear transformations.

Implementation

Now that we have a high-level understanding of how multi-head attention works, let's look at how we can implement it in code. We will be using PyTorch as our deep learning framework, but the concepts should be applicable to other frameworks as well.
First, let's define some input data and the number of heads that we want to use:
import torch
# Input data
X = torch.randn(batch_size, seq_len, dim)
K = torch.randn(batch_size, seq_len, dim)
V = torch.randn(batch_size, seq_len, dim)
# Number of heads
h = 8
Next, we will define the linear transformations that we will use to project the input, keys, and values. These transformations will have the following dimensions:
  • $W_{i,Q} \in \mathbb{R}^{d_{model} \times d_k}$
  • $W_{i,K} \in \mathbb{R}^{d_{model} \times d_k}$
  • $W_{i,V} \in \mathbb{R}^{d_{model} \times d_v}$
  • $W_o \in \mathbb{R}^{hd_v \times d_{model}}$
Where $d_{model}$ is the dimensionality of the input and output, $d_k$ is the dimensionality of the keys, and $d_v$ is the dimensionality of the values.
# Linear transformations
W_Q = torch.randn(h, dim, dim_k)
W_K = torch.randn(h, dim, dim_k)
W_V = torch.randn(h, dim, dim_v)
W_O = torch.randn(h * dim_v, dim)

With these linear transformations defined, we can now implement the multi-head attention layer. We will do this in two steps:

  • Compute the attention weights for each head and apply them to the values
  • Concatenate the resulting value vectors and apply the final linear transformation

Here is the code to do this:

# Step 1: Compute attention weights and apply them to the values
attention_outputs = []
for i in range(h):
  # Project input, keys, and values
  X_proj = X.matmul(W_Q[i])
  K_proj = K.matmul(W_K[i])
  V_proj = V.matmul(W_V[i])
  # Compute attention weights
  weights = torch.softmax(X_proj.matmul(K_proj.transpose(-2, -1)) / math.sqrt(dim_k), dim=-1)
  # Apply attention weights to values
  head_output = torch.sum(weights.unsqueeze(-1) * V_proj, dim=1)
  attention_outputs.append(head_output)
# Step 2: Concatenate and apply final linear transformation
Y = torch.cat(attention_outputs, dim=1).matmul(W_O)
That's it! We have now implemented a multi-head attention layer in PyTorch.

Conclusion

In this post, we learned about the attention mechanism and how it can be used to allow a model to focus on specific parts of the input while

Comments

Latest Posts

Introduction to CNNs with Attention Layers

  Convolutional Neural Networks (CNNs) have been a popular choice for tasks such as image classification, object detection, and natural language processing. They have achieved state-of-the-art performance on a variety of tasks due to their ability to learn powerful features from data. However, one limitation of CNNs is that they may not always be able to capture long-range dependencies or relationships in the data. This is where attention mechanisms come into play. Attention mechanisms allow a model to focus on specific parts of the input when processing it, rather than processing the entire input equally. This can be especially useful for tasks such as machine translation, where the model needs to pay attention to different parts of the input at different times. In this tutorial, we will learn how to implement a CNN with an attention layer in Keras and TensorFlow. We will use a dataset of images of clothing items and train the model to classify them into different categories. Setting

Intelligent Medicine and Health Care: Applications of Deep Learning in Computational Medicine

Machine learning is a subset of deep learning (DL), commonly referred to as deep structured learning or hierarchical learning. It is loosely based on how neurons interact with one another in animal brains to process information. Artificial neural networks (ANNs), a layered algorithmic design used in deep learning (DL), evaluate data to mimic these connections. A DL algorithm can "learn" to identify correlations and connections in the data by examining how data is routed through an ANN's layers and how those levels communicate with one another. Due to these features, DL algorithms are cutting-edge tools with the potential to transform healthcare. The most prevalent varieties in the sector have a range of applications.    Deep learning is a growing trend in healthcare artificial intelligence, but what are the use cases for the various types of deep learning? Deep learning and transformers have been used in a variety of medical applications. Here are some examples: Diagnosis

Text-to-Text Transformer (T5-Base Model) Testing For Summarization, Sentiment Classification, and Translation Using Pytorch and Torchtext

The Text-to-Text Transformer is a type of neural network architecture that is particularly well-suited for natural language processing tasks involving the generation of text. It was introduced in the paper " Attention is All You Need " by Vaswani et al. and has since become a popular choice for many NLP tasks, including language translation, summarization, and text generation. One of the key features of the Transformer architecture is its use of self-attention mechanisms, which allow the model to "attend" to different parts of the input text and weights their importance in generating the output. This is in contrast to traditional sequence-to-sequence models, which rely on recurrent neural networks (RNNs) and can be more difficult to parallelize and optimize. To fine-tune a text-to-text Transformer in Python, you will need to start by installing the necessary libraries, such as TensorFlow or PyTorch. You will then need to prepare your dataset, which should consist o

An Introduction to NeRF: Neural Radiance Fields

  Neural Radiance Fields (NeRF) is a machine learning model that can generate high-resolution, photorealistic 3D models of scenes or objects from a set of 2D images. It does this by learning a continuous 3D function that maps positions in 3D space to the radiance (intensity and color) of the light that would be observed at that position in the scene. To create a NeRF model, the model is trained on a dataset of 2D images of the scene or object, along with their corresponding 3D positions and orientations. The model learns to predict the radiance at each 3D position in the scene by using a combination of convolutional neural networks (CNNs) and a differentiable renderer. Why Use Neural Fields? The Neural Fields model has a number of key features that make it particularly well-suited for generating high-quality 3D models from 2D images: Continuity: Because the NeRF model learns a continuous 3D function, it can generate smooth, continuous 3D models that do not have any "gaps" or

How to Run Stable Diffusion on Your PC to Generate AI Images

  First of all, let's define Stable Diffusion. Stable Diffusion is an open-source machine learning model that is capable of creating images from text, altering images based on text, or adding information to low-resolution or low-detail images. Also, it can produce outcomes that are comparable to those from DALL-E 2 and MidJourney  as it was trained on billions of images. Such a model was created by Stability AI and made available to the public for the first time on August 22, 2022. Unlike several AI text-to-image generators, Stable Diffusion doesn't have a clean user interface (yet), but it has a very permissive license, and luckily it is open-source so we can use it on our PC and maybe fine-tune it to do other customized image generation tasks.  What Do You Need to Run Stable Diffusion on Your Computer? To be able to run a stable diffusion model on your computer, the latter should at least be a Gaming Laptop with the following requirements:  A GPU with at least 6 gigabytes (

How to Build and Train a Vision Transformer From Scratch Using TensorFlow

The Transformer  is a type of attention-based model that uses self-attention mechanisms to process the input data. It consists of multiple encoder and decoder layers, each of which is made up of a multi-head self-attention mechanism and a fully-connected feedforward network. The Transformer layer takes in a sequence of input vectors and produces a sequence of output vectors. In the case of an image classification task, each input vector can represent a patch of the image, and the output vectors can be used to predict the class label for the image. How to build a Vision Transformer from Scratch Using Tensorflow   Building a Vision Transformer from scratch in TensorFlow can be a challenging task, but it is also a rewarding experience that can help you understand how this type of model works and how it can be used for image recognition and other computer vision tasks. Here is a step-by-step guide on how you can build a Vision Transformer in TensorFlow: Start by installing TensorFlow and

How to Create AI images with Stable Diffusion Model (Extended Article)

  In a previous article,  we showed how to prepare your computer to be able to run Stabe Diffusion, by installing some dependencies, creating a virtual environment, and downloading Stabe Diffusion from Github. In this article, we will show you how to run Stable Diffusion and create images. First of all, You must activate the ldm environment we built previously each time you wish to use stable diffusion because it is crucial. In the Miniconda3 window, type conda activate ldm and press "Enter." The (ldm) on the left-hand side denotes the presence of an active ldm environment.  Note: This command is only necessary while Miniconda3 is opened. As long as you don't close the window, the ldm environment will be active. Before we can generate any images, we must first change the directory to "C:stable-diffusionstable-diffusion-main.":  cd C:stable-diffusionstable-diffusion-main. How to Create Images with Stable Diffusion We're going to use a program called txt2img.p