
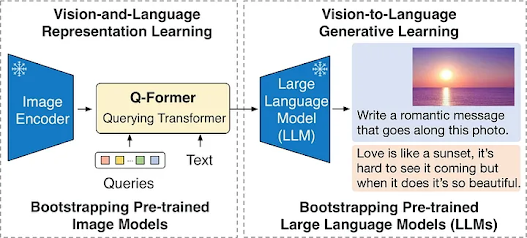
What is Q-Former?
How Does Q-Former Work?
Architecture of Q-Former
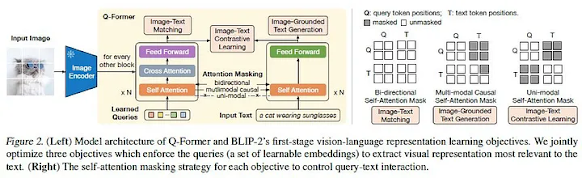
Pre-training Objectives
To achieve its impressive performance, Q-Former employs a multi-stage pre-training strategy. During the first stage, the image encoder is frozen, and the Q-Former module is trained on three distinct tasks:
- Image-Text Contrastive Loss: This loss encourages the model to align the visual features extracted from the image with the corresponding text description.
- Image-Text Retrieval Loss: This loss aims to correctly match visual features with their corresponding text descriptions.
- Text Generation Loss: This loss penalizes the model for generating text descriptions that are not semantically consistent with the input image.
Applications of Q-Former
Q-Former's versatility has propelled its adoption across a wide range of applications, including:
- Image Captioning: Generating natural language descriptions for images, providing insights into their content.
- Visual Question Answering (VQA): Answering questions about images based on their content and context.
- Visual Storytelling: Creating coherent narratives based on a sequence of images.
- Visual Dialog Systems: Engaging in natural conversations about images, providing informative and engaging responses.
Implementing Q-Former in Python
To leverage the power of Q-Former in your own Python projects, you can utilize the Hugging Face Transformers library. The BLIP-2 model, which incorporates Q-Former, is readily available within the library. To integrate Q-Former into your code, follow these steps:
Install Hugging Face Transformers: Install the Hugging Face Transformers library using pip: pip install transformers
- Load the BLIP-2 Model: Import the BLIP-2 model from the Transformers library:
from transformers import Blip2QFormerModel, AutoModelForSeq2SeqLM
model = Blip2QFormerModel.from_pretrained("salesforce/blip2-opt-2.7b")
- Prepare Input Data: Define your input data, including the image and text descriptions.
- Generate Text Descriptions: Use the model's generate() method to generate text descriptions for the input images.
With these steps, you can effectively integrate Q-Former into your Python applications, enabling seamless interaction between images and text for a variety of AI-powered tasks.
Train the Q-Former Model in Your Own Data
Training or fine-tuning the Q-Former model on your own data involves a multi-step process that encompasses data preparation, model configuration, training, and evaluation. Here's a step-by-step guide:
Step 1: Data Preparation
- Data Collection: Gather a dataset of image-text pairs that align with the specific task you aim to address. Ensure the data is clean, well-organized, and labeled appropriately.
- Data Preprocessing: Preprocess the data to ensure consistency and compatibility with the model. This may involve image resizing, text normalization, and encoding.
- Data Splitting: Split the dataset into training, validation, and testing subsets. The training set will be used for model training, the validation set for hyperparameter tuning, and the testing set for final evaluation.
import pandas as pd
from PIL import Image
from transformers import AutoTokenizer
# Load the dataset
df = pd.read_csv("your_dataset.csv")
# Preprocess the images
for index, row in df.iterrows():
    image_path = row["image_path"]
    image = Image.open(image_path)
    image = image.resize((224, 224))
    image = np.array(image)
    df.loc[index, "image"] = image
# Preprocess the text descriptions
tokenizer = AutoTokenizer.from_pretrained("salesforce/blip2-opt-2.7b")
for index, row in df.iterrows():
    text = row["text"]
    encoded_text = tokenizer(text=text, return_tensors="pt")
    df.loc[index, "encoded_text"] = encoded_text
# Split the dataset into training, validation, and testing subsets
train_df, val_df, test_df = train_test_split(df, test_size=0.2)
Step 2: Model Configuration
- Model Selection: Choose the appropriate Q-Former model architecture based on your task requirements. For instance, BLIP-2 is a popular choice for image captioning.
- Model Initialization: Initialize the model either from a pre-trained checkpoint or from scratch. Pre-trained checkpoints can provide a head start, but fine-tuning from scratch may yield better results for your specific dataset.
- Model Tokenizer: Choose an appropriate tokenizer for your data format. Hugging Face provides various tokenizers for different text encoding schemes.
from transformers import Blip2QFormerModel, AutoModelForSeq2SeqLM
# Choose the appropriate Q-Former model architecture
model = Blip2QFormerModel.from_pretrained("salesforce/blip2-opt-2.7b")
Step 3: Model Training
- Training Setup: Set up the training environment, including hardware resources (CPU, GPU) and hyperparameters such as learning rate, batch size, and number of epochs.
- Data Loading: Define data loaders for the training and validation sets. Data loaders efficiently load data batches into the model for training.
- Loss Function: Choose an appropriate loss function that aligns with your task. For image captioning, a cross-entropy loss is commonly used.
- Optimizer: Select an optimizer to update the model's parameters during training. Adam is a popular optimizer for transformer models.
- Training Loop: Implement a training loop that iteratively feeds the model training data, calculates loss, updates parameters using the optimizer, and evaluates performance on the validation set.
from torch.utils.data import DataLoader
import torch
from tqdm import tqdm
# Set up the training environment
device = torch.device("cuda" if torch.cuda.is_available() else "cpu")
# Define the training and validation data loaders
train_data = QFormerDataset(train_df)
train_loader = DataLoader(train_data, batch_size=32, shuffle=True, num_workers=4)
val_data = QFormerDataset(val_df)
val_loader = DataLoader(val_data, batch_size=32, num_workers=4)
# Define the loss function and optimizer
loss_func = CrossEntropyLoss()
optimizer = AdamW(model.parameters(), lr=3e-4)
# Implement the training loop
epochs = 10
for epoch in range(epochs):
    model.train()
    losses = []
    for i, batch in enumerate(tqdm(train_loader)):
        images, encoded_texts, targets = batch
        images = images.to(device)
        encoded_texts = encoded_texts.to(device)
        targets = targets.to(device)
        outputs = model(images, encoded_texts)
        loss = loss_func(outputs["logits"], targets)
        losses.append(loss.item())
        optimizer.zero_grad()
        loss.backward()
        optimizer.step()
    val_loss = evaluate(model, val_loader)
    print("Epoch: {} - Training Loss: {:.4f} - Validation Loss: {:.4f}".format(
        epoch + 1, losses[-1], val_loss
    ))
Step 4: Evaluation
- Evaluation Metrics: Determine appropriate evaluation metrics for your task. For image captioning, metrics like BLEU-4 and ROUGE-L are commonly used.
- Evaluation Procedure: Evaluate the model's performance on the testing set using the chosen evaluation metrics. Compare the results to the validation set performance to assess generalization.
from torchmetrics import MetricCollection, BLEU4, ROUGE_L
# Define the evaluation metrics
metrics = MetricCollection([BLEU4(), ROUGE_L()])
# Evaluate the model on the testing set
test_loss = evaluate(model, test_loader)
metrics.compute(predictions=predictions, references=targets)
print("Test Loss: {:.4f} - BLEU-4: {:.4f} - ROUGE-L: {:.4f}".format(
    test_loss, metrics[BLEU4].value(), metrics[ROUGE_L].value()
))
Comments
Post a Comment