What is CLIP?
Architecture of CLIP
How CLIP Works
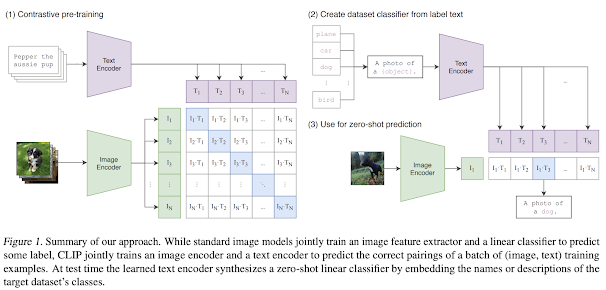
CLIP works by encoding both the image and the text into a common embedding space. The text and image embeddings are then compared using a cosine similarity function to determine the similarity between the text and the image. The similarity score is used to classify the image into a category. CLIP can classify images into a wide range of categories, including objects, scenes, and attributes.
To establish a connection between images and text, both need to be transformed into embeddings. Even if you haven't consciously thought about it, you've likely encountered embeddings before. Let's illustrate this with an example: Imagine you have one cat and two dogs. You can represent this information as points on a graph, as shown below. While it may seem straightforward, what we've essentially done is embed this information onto the X-Y grid, which you might recall from your middle school math lessons (known as Euclidean space). There are various ways to represent this data, such as arranging dogs before cats or introducing an additional dimension for other animals like raccoons.
In essence, think of embedding as a method to compress information into mathematical space. We've taken data about dogs and cats and compressed it into mathematical space. The same concept can be applied to both text and images.
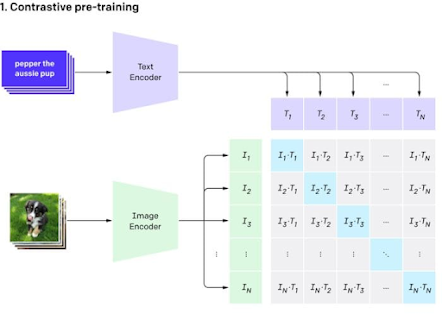
The CLIP model comprises two sub-models known as encoders:
- A text encoder, which transforms text into mathematical representations.
- An image encoder, which does the same for images.
When fitting a supervised learning model, you must evaluate its performance - the aim is to create a model that is as "good" as possible and as "bad" as little as possible.
The CLIP model follows the same principle: the text encoder and image encoder are trained to maximize their effectiveness and minimize their shortcomings.
So, how do we quantify "goodness" and "badness"?
In the illustration below, you'll see a set of purple text cards being input into the text encoder. Each card's output is a set of numerical values. For instance, the top card, "pepper the aussie pup," is processed by the text encoder, transforming it into a series of numbers like (0, 0.2, 0.8).
The same process applies to images: each image undergoes transformation by the image encoder, resulting in a series of numerical values. For instance, the picture of what appears to be Pepper the Aussie pup is converted into numbers like (0.05, 0.25, 0.7).
Applications of CLIP
CLIP has several applications in computer vision, including:
- Zero-shot image classification: CLIP can classify images into a wide range of categories without any training on the specific dataset.
- Fine-tuned image classification: CLIP can be fine-tuned on custom datasets to improve its performance on specific tasks.
- Semantic image retrieval: CLIP can be used for text-to-image and reverse image search.
- Content moderation: CLIP can be used to filter out graphic or NSFW images.
Fine-tuning CLIP on Custom Datasets
Fine-tuning CLIP on custom datasets involves two steps: preparing the data and fine-tuning the model.
- Preparing the Data
To fine-tune CLIP on custom datasets, we need to prepare the data in a specific format. The data should be in the form of a CSV file, where each row contains the path to the image and the corresponding label. The label should be a text description of the image, and it should be in the format of a sentence.
- Fine-tuning the Model
To fine-tune the CLIP model on custom datasets, we can use the Hugging Face Transformers library. The Hugging Face Transformers library provides a simple API for fine-tuning transformer models on custom datasets. Here is an example code snippet that demonstrates how to fine-tune CLIP on custom datasets using the Hugging Face Transformers library:
from transformers import CLIPProcessor, CLIPModel, CLIPTextClassificationHead
import torch
# Load the pre-trained CLIP model
model = CLIPModel.from_pretrained('openai/clip-vit-base-patch32')
# Load the CLIP processor
processor = CLIPProcessor.from_pretrained('openai/clip-vit-base-patch32')
# Load the custom dataset
dataset = load_custom_dataset()
# Fine-tune the model on the custom dataset
for image, label in dataset:
    # Encode the image and the label
    image_encoding = processor(images=image, return_tensors="pt").pixel_values
    label_encoding = processor(text=label, return_tensors="pt").last_hidden_state
    # Classify the image
    logits_per_image, logits_per_text = model(image_encoding, label_encoding)
    probs = logits_per_image.softmax(dim=-1).tolist()[0]
    print(probs)


Comments
Post a Comment