
How to Fine-Tune DeiT: Data-efficient Image Transformer

If you're interested in the latest advances in deep learning for computer vision, you may have heard about DeiT, or the Data-efficient Image Transformer. DeiT is a state-of-the-art model for image classification that achieves impressive accuracy while using fewer training samples than its predecessors. In this blog post, we'll take a closer look at DeiT and how you can implement and fine-tune it in TensorFlow.

What is DeiT?

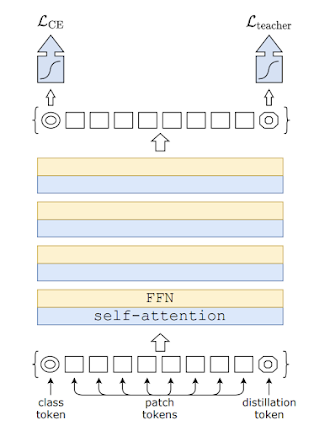
DeiT is a model developed by researchers at META AI that builds on the success of the Transformer architecture, which was originally developed for natural language processing tasks. Like the Transformer, DeiT uses self-attention to process input data, allowing it to capture complex relationships between image features. However, DeiT is specifically designed for image classification tasks, and achieves this by using a novel distillation-based training method that enables it to be trained on smaller datasets than previous models.

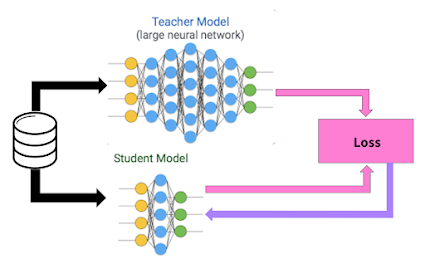
The key innovation behind DeiT is the use of distillation through attention. This involves training a smaller "student" model to mimic the behavior of a larger "teacher" model by paying attention to the same parts of the input. The student model is then fine-tuned on a smaller dataset and can achieve similar accuracy to the teacher model while using far fewer training samples. In the case of DeiT, the teacher model is a much larger model that is pre-trained on a large dataset, while the student model is trained using distillation on a smaller dataset. 

How to Implement DeiT in TensorFlow

Implementing DeiT in TensorFlow is relatively straightforward, thanks to the availability of open-source implementations from Facebook AI and the TensorFlow community. Here are the steps you can follow to implement and fine-tune DeiT in TensorFlow:

  • Install the necessary packages and dependencies, including TensorFlow, the TensorFlow model garden, and the PyTorch Lightning framework.
  • Download the DeiT model weights and configuration files from the official GitHub repository, or use the pre-trained models available in the TensorFlow model garden.
  • Load the model into TensorFlow using the appropriate API, depending on the model format.
  • Fine-tune the model on your own dataset using transfer learning techniques, such as freezing the early layers of the model and training only the later layers.
  • Evaluate the performance of the model on your test set, and adjust the hyperparameters as needed to achieve optimal accuracy.

By following these steps, you can easily implement and fine-tune DeiT in TensorFlow for your own image classification tasks.

Keras Implementation of DeiT

In this example code, we first load the DeiT model architecture and weights using the load_model function in TensorFlow We then freeze the first few layers of the model using a for loop and add a new dense layer for classification. We compile the model with an optimizer, loss function, and metrics.
Next, we prepare the data for training and validation using ImageDataGenerator. We define the training and validation directories, the target size of the images, the batch size, and the class mode.
We define callbacks as saving the best model and early stopping. We then train the model on the data and validate using the fit function. We pass in the training and validation generators, the number of steps per epoch, the number of epochs, and the callbacks.
Finally, we evaluate the model on a test set using evaluate_generator. We load the best model weights and pass in the test generator and the number of steps. We print the test accuracy and plot the training and validation loss and accuracy.
Here's a TensorFlow example for fine-tuning and testing DeiT on a specific dataset: 
import tensorflow as tf
from tensorflow.keras.layers import Input, Dense
from tensorflow.keras.optimizers import Adam
from tensorflow.keras.metrics import categorical_accuracy
from tensorflow.keras.preprocessing.image import ImageDataGenerator
from tensorflow.keras.callbacks import ModelCheckpoint, EarlyStopping
from tensorflow.keras.applications import EfficientNetB7
from tensorflow.keras.models import Model
from tensorflow.keras.utils import plot_model
import matplotlib.pyplot as plt
# Load the DeiT model architecture and weights
deit = tf.keras.models.load_model('deit_model.h5')
# Freeze the first few layers of the model
for layer in deit.layers[:-10]:
    layer.trainable = False
# Add a new dense layer for classification
x = deit.layers[-2].output
predictions = Dense(3, activation='softmax')(x)
model = Model(inputs=deit.input, outputs=predictions)
# Compile the model with an appropriate optimizer and loss function
model.compile(optimizer=Adam(lr=0.001),
              loss='categorical_crossentropy',
              metrics=[categorical_accuracy])
# Prepare the data for training and validation
train_data_dir = 'train_data'
validation_data_dir = 'validation_data'
train_datagen = ImageDataGenerator(
    rescale=1. / 255,
    shear_range=0.2,
    zoom_range=0.2,
    horizontal_flip=True)
validation_datagen = ImageDataGenerator(rescale=1. / 255)
train_generator = train_datagen.flow_from_directory(
    train_data_dir,
    target_size=(224, 224),
    batch_size=32,
    class_mode='categorical')
validation_generator = validation_datagen.flow_from_directory(
    validation_data_dir,
    target_size=(224, 224),
    batch_size=32,
    class_mode='categorical')
# Define callbacks for saving the best model and early stopping
filepath = "best_model.h5"
checkpoint = ModelCheckpoint(filepath, monitor='val_categorical_accuracy', verbose=1,
                             save_best_only=True, mode='max')
early_stop = EarlyStopping(monitor='val_categorical_accuracy', patience=5, mode='max')
# Train the model on the data and validate
history = model.fit(
    train_generator,
    steps_per_epoch=train_generator.samples // train_generator.batch_size,
    epochs=20,
    validation_data=validation_generator,
    validation_steps=validation_generator.samples // validation_generator.batch_size,
    callbacks=[checkpoint, early_stop])
# Evaluate the model on a test set
test_data_dir = 'test_data'
test_datagen = ImageDataGenerator(rescale=1. / 255)
test_generator = test_datagen.flow_from_directory(
    test_data_dir,
    target_size=(224, 224),
    batch_size=32,
    class_mode='categorical')
model.load_weights('best_model.h5')
test_loss, test_acc = model.evaluate_generator(test_generator, steps=test_generator.samples // test_generator.batch_size)
print('Test accuracy:', test_acc)
# Plot the training and validation loss and accuracy
plt.plot(history.history['loss'])
plt.plot(history.history['val_loss'])
plt.title('Model loss')
plt.ylabel('Loss')
plt.xlabel('Epoch')
plt.legend(['Train', 'Validation'], loc='upper left')
plt.show()
plt.plot(history.history['categorical_accuracy'])
plt.plot(history.history['val_categorical_accuracy'])
plt.title('Model accuracy')
plt.ylabel('Accuracy')
plt.xlabel('Epoch')
plt.legend(['Train', 'Validation'], loc='upper left')
plt.show()


Conclusion

DeiT is an exciting development in the field of deep learning for computer vision and has the potential to enable more efficient and accurate image classification using smaller datasets. By using distillation through attention, DeiT is able to learn from the behavior of larger, pre-trained models and achieve state-of-the-art performance on image classification tasks. With the availability of open-source implementations in TensorFlow and other frameworks, it is now easier than ever to experiment with DeiT and other advanced deep-learning models.

Comments

Latest Posts

Video Classification Using CNN and Transformer: Hybrid Model

Video classification is an important task in computer vision, with many applications in areas such as surveillance, autonomous vehicles and medical diagnostics. Until recently, most methods used 2D convolutional neural networks (CNNs) to classify videos. However, this approach has several limitations, including being unable to capture the temporal relationships between frames and being unable to capture 3D features like motion.  To address these challenges, 3D convolutional neural networks (3D CNNs) have been proposed. 3D CNNs are similar to 2D CNNs but are designed to capture the temporal relationships between video frames by operating on a sequence of frames instead of individual frames. Moreover, 3D CNNs have the ability to learn 3D features from video sequences, such as motion, which are not possible with 2D CNNs. In this blog post, we will discuss how to classify videos using 3D convolutions in Tensorflow. We will first look at the architecture of 3D CNNs and then discuss how to b

Graph Attention Neural Networks

  Graphs are a fundamental data structure that can represent a wide range of real-world problems, such as social networks, biological networks, and recommender systems. Graph neural networks (GNNs) are a family of neural networks that operate on graph-structured data and have shown promising results in various applications. However, traditional GNNs are limited in their ability to capture long-range dependencies and attend to relevant nodes and edges. This is where Graph Attention Networks (GATs) come in. In this blog post, we will explore the concept of GATs, their advantages over traditional GNNs, and their implementation in TensorFlow. Graph Attention Networks: A Brief Overview Graph Attention Networks (GATs) were introduced in a paper by Petar Veličković et al. in 2018 . GATs are a type of GNN that uses an attention mechanism to allow each node to selectively attend to its neighbors. In other words, GATs learn to assign different weights to different nodes in the graph, based on

Fine-Tuning a Pre-trained BERT Transformer Model For Your Own Dataset

BERT stands for "Bidirectional Encoder Representations from Transformers". It is a pre-trained language model developed by Google that has been trained on a large corpus of text data to understand the contextual relationships between words (or sub-words) in a sentence. BERT has proven to be highly effective for various natural languages processing tasks such as question answering, sentiment analysis, and text classification.  The primary technological advancement of BERT is the application of Transformer's bidirectional training, a well-liked attention model, to language modeling. In contrast, earlier research looked at text sequences from either a left-to-right or a combined left-to-right and right-to-left training perspective. The study's findings demonstrate that bidirectionally trained language models can comprehend the context and flow of language more deeply than single-direction language models. The authors of the paper describe a unique method called Masked

Introduction to Word and Sentence Embedding

In the field of Natural Language Processing (NLP) , the use of word and sentence embeddings has revolutionized the way we analyze and understand language. Word embeddings and sentence embeddings are numerical representations of words and sentences, respectively, that capture the underlying semantics and meaning of the text. In this blog post, we will discuss what word and sentence embeddings are, how they are created, and how they can be used in NLP tasks. We will also provide some Python code examples to illustrate the concepts. Word Embeddings: A word embedding is a way of representing words as high-dimensional vectors. These vectors capture the meaning of a word based on its context in a given text corpus. The most commonly used approach to creating word embeddings is through the use of neural networks, particularly the Word2Vec algorithm. The Word2Vec algorithm is a neural network model that learns word embeddings by predicting the context in which a word appears. The model takes

Text-to-Text Transformer (T5-Base Model) Testing For Summarization, Sentiment Classification, and Translation Using Pytorch and Torchtext

The Text-to-Text Transformer is a type of neural network architecture that is particularly well-suited for natural language processing tasks involving the generation of text. It was introduced in the paper " Attention is All You Need " by Vaswani et al. and has since become a popular choice for many NLP tasks, including language translation, summarization, and text generation. One of the key features of the Transformer architecture is its use of self-attention mechanisms, which allow the model to "attend" to different parts of the input text and weights their importance in generating the output. This is in contrast to traditional sequence-to-sequence models, which rely on recurrent neural networks (RNNs) and can be more difficult to parallelize and optimize. To fine-tune a text-to-text Transformer in Python, you will need to start by installing the necessary libraries, such as TensorFlow or PyTorch. You will then need to prepare your dataset, which should consist o

Introduction to CNNs with Attention Layers

  Convolutional Neural Networks (CNNs) have been a popular choice for tasks such as image classification, object detection, and natural language processing. They have achieved state-of-the-art performance on a variety of tasks due to their ability to learn powerful features from data. However, one limitation of CNNs is that they may not always be able to capture long-range dependencies or relationships in the data. This is where attention mechanisms come into play. Attention mechanisms allow a model to focus on specific parts of the input when processing it, rather than processing the entire input equally. This can be especially useful for tasks such as machine translation, where the model needs to pay attention to different parts of the input at different times. In this tutorial, we will learn how to implement a CNN with an attention layer in Keras and TensorFlow. We will use a dataset of images of clothing items and train the model to classify them into different categories. Setting

Introduction to Reinforcement Learning with Human Feedback (RLHF)

 A common machine learning technique called reinforcement learning (RL) teaches an agent how to choose actions that will maximize a reward signal. By getting rewarded for activities that produce desirable results, the agent learns from its environment. The reward signal, however, may not be clear in many real-world situations or may be challenging to get. In these circumstances, human feedback can provide the agent the direction it needs to learn effectively. Reinforcement Learning with Human Feedback is what this is (RLHF). In this article, we'll look at how to use Python to implement a reinforcement learning algorithm with human feedback. We'll simulate a learning challenge using the OpenAI Gym environment, and we'll construct the reinforcement learning method using the Tensorforce library . Introduction to Reinforcement Learning (RL) The goal of Reinforcement Learning (RL), a particular approach to machine learning, is to teach an agent how to make decisions in the rea