
How to Git (Part 1): Git and GitHub


 Git is a version control system that is used for tracking changes in computer files and coordinating work on those files among multiple people. It is primarily used for source code management in software development, but it can be used to keep track of changes in any set of files. In this post, we will show how to create a repository using Git and push it to GitHub using git commands. 
You need to install Git on your computer before you can use it. The most recent version should probably be updated even if it is already installed. You can either download the source code and compile it yourself, or you can install it as a package or through another installer. To install Git follow the steps explained in this tutorial 
Once you have installed Git, you can use it to initialize a new repository for your project by running the following command in a terminal or command prompt:

$ cd ~/Users/Abdul 

$ mkdir NewRepo

$ git init

This will create a new directory called .git in your project folder named as NewRepo, which will be used by Git to store information about the repository.
To start tracking changes to your code with Git, you need to add the files to the repository. This is done using the git add command, followed by the names of the files you want to add. For example, to add all the files in your project folder, you can use the git add . command. For Example, let's add one text file to the project and then track the changes. 
$ touch Hello.txt
Once you have added the file, you can commit the changes to the repository using the git commit command. This will create a new commit, which is a snapshot of your code at a particular point in time. It is a good idea to include a commit message with each commit, which describes the changes that were made. You can do this by passing the -m flag to the git commit command, followed by your commit message in quotation marks.
For example:

$ git commit -m "Added new File"

Now if you type git status command, you can find out that Git has added the file to the staging environment.

Pushing the created Repo onto GitHub

You don't need to use GitHub if you only want to monitor your code locally. But if you want to collaborate, you can utilize GitHub to change the project's code together.
to do this, you first need to create a new repository on GitHub, name it, and provide a brief description. Go to the GitHub home page after logging in to start a new repository. The "New repository" option can be found in the top right corner of the navbar, underneath the plus sign next to your profile picture:

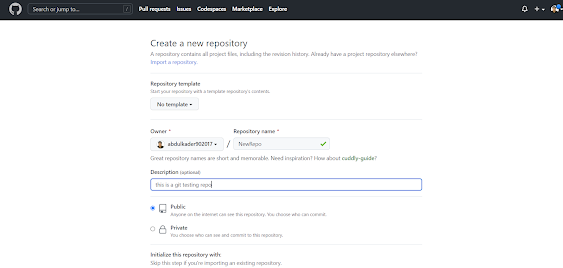
Once you're done, click the "Create repository" button to create your new repository.
GitHub will ask you if you want to add an existing local repo or build a new one from start. In this instance, since we've already started a brand-new repository locally, we want to push it to GitHub, therefore adhere to the instructions in the part under "...or push an existing repository from the command line":
$ git remote add origin https://github.com/abdulkader902017/NewRepo.git
$ git push -u origin master
With that said, we showed you how to create a new Repo using Git on your own local Computer and then push it onto GitHub to be publicly available for everyone who would to contribute. Finally, there are many other commands and features in Git that you can use to manage your repository and collaborate with others. To learn more, you can read the Git documentation or take an online course on Git.


Comments

Latest Posts

How to Run Stable Diffusion on Your PC to Generate AI Images

  First of all, let's define Stable Diffusion. Stable Diffusion is an open-source machine learning model that is capable of creating images from text, altering images based on text, or adding information to low-resolution or low-detail images. Also, it can produce outcomes that are comparable to those from DALL-E 2 and MidJourney  as it was trained on billions of images. Such a model was created by Stability AI and made available to the public for the first time on August 22, 2022. Unlike several AI text-to-image generators, Stable Diffusion doesn't have a clean user interface (yet), but it has a very permissive license, and luckily it is open-source so we can use it on our PC and maybe fine-tune it to do other customized image generation tasks.  What Do You Need to Run Stable Diffusion on Your Computer? To be able to run a stable diffusion model on your computer, the latter should at least be a Gaming Laptop with the following requirements:  A GPU with at least 6 gigabytes (

How to Create AI images with Stable Diffusion Model (Extended Article)

  In a previous article,  we showed how to prepare your computer to be able to run Stabe Diffusion, by installing some dependencies, creating a virtual environment, and downloading Stabe Diffusion from Github. In this article, we will show you how to run Stable Diffusion and create images. First of all, You must activate the ldm environment we built previously each time you wish to use stable diffusion because it is crucial. In the Miniconda3 window, type conda activate ldm and press "Enter." The (ldm) on the left-hand side denotes the presence of an active ldm environment.  Note: This command is only necessary while Miniconda3 is opened. As long as you don't close the window, the ldm environment will be active. Before we can generate any images, we must first change the directory to "C:stable-diffusionstable-diffusion-main.":  cd C:stable-diffusionstable-diffusion-main. How to Create Images with Stable Diffusion We're going to use a program called txt2img.p

U-Net Implementation For the Segmentation of Nuclei

  Introduction Image segmentation is the partitioning of images into various regions, in which every region has a different entity. An efficient tool for image segmentation is a convolutional neural network (CNN) . Recently, there has been a significant impact of CNNs that are designed to perform image segmentation. One the best models presented was the U-Net . A U-Net is U-shaped convolutional neural network that was originally designed to segment biomedical images. Such a network is better than conventional models, in terms of architecture and pixel-based image segmentation formed from convolutional neural network layers. Similar to all CNNs, this network consists of convolution, Max-pooling, and ReLU activation layers. However, in a general view, U-Net can be seen as an encoder-decoder network. The encoder is the first part of this network and it is a conventional convolutional neural network like VGG or ResNet that is composed of convolution, pooling, and downsampling laye

Recognizing AI-generated Faces Using Deep Learning

  Artificial intelligence is reshaping the world . This technology is changing the way we handle our daily tasks. Deep learning is one method to go toward artificial intelligence and it has so far shown great significance when applied to various areas, from medicine to computer vision.  However, deep learning showed also that it can be used to harm or help in fraudulence, depending on how it is applied. One example of this is what is called Generative adversarial learning . In 2016, generative adversarial networks (GANs) were presented to the world, and since then many versions of these networks were developed. A GAN can be defined as a machine learning model that consists of two neural networks competing with each other. These two networks are called generator and discriminator, and each has a different role; one is for generating images from random noise given as input, while the latter is for detecting whether the ge

Why is everyone talking about ChatGPT?

    Well, a simple answer to that question is that  ChatGPT is so cool!!! Why cool! It is because it can engage in conversational interaction just like humans, which is what artificial intelligence models should be like, mimicking human behavior as much as possible. With that said, let’s start by first getting to know ChatGPT. What is it? How was it trained? And How can we use it?   What is ChatGPT?   Conversational AI refers to the use of artificial intelligence to enable computers to have natural, human-like conversations with people. This technology has become increasingly popular in recent years, as it allows businesses to automate customer service and enables people to interact with computers in a more natural and intuitive way. Some of the key components of conversational AI include natural language processing (NLP), which allows computers to understand and interpret human language, and machine learning, which enables the computer to improve its performance over time. Ove

Multi-Label Classification with Deep Learning

In machine learning, multilabel classification is a classification task where multiple labels may be assigned to each instance. This is in contrast to traditional classification, where each instance is assigned only one label. Multilabel classification is useful in cases where there are multiple possible labels for a single instance, and each label represents a different aspect or category of the data. For example, an image recognition system might be trained to recognize multiple objects in an image, such as a cat, a dog, and a person, and assign one or more labels to each image accordingly. Because each instance can have multiple labels, the output of a multilabel classification model is often represented as a binary matrix, where each column corresponds to a different label and each row corresponds to a different instance. How to create a convolutional neural network for multilabel classification in TensorFlow! To create a convolutional neural network (CNN) for multilabel classifica

How To Create Videos Using Artificial Intelligence Content Creation Tools

  Artificial intelligence (AI) is used by AI video creators to produce videos using information from a range of sources, such as text, images, and audio files. AI video creators can generate videos with little to no human input, however, some human direction is still required. So how does this work? First, you need content, script/text to be narrated in your video, which is the story you are telling. You can have your own script but guess what! you can also generate content using some text generators such as Copy.ai , Pictory AI , or Rytr AI . These text generators will write you a long text/blog/story with a little help from you. Let's see an example of how we can generate text using Copy.ai for free.  First, go to Copy.ai  and Create New Document. The second step is to go to Tools on the left side of the Figure above, and then select the type of text we want to generate. As seen in the Figure below, say we want to generate a Blog. To do so, write a blog in the Tool button, and th