
As machine learning engineers, we know that fine-tuning a transformer imported from Hugging Face can be an intimidating task. But with the right tools and strategies, you can quickly get your model up and running in no time! In this blog post, we’ll go over some of the best practices for fine-tuning a Transformer from Hugging Face.
The first step is to select a pre-trained model that’s suitable for your use case. You can find several models on their original websites or GitHub pages - make sure to choose one based on language type (English vs French) as well as domain-specific tasks such as sentiment analysis or natural language understanding (NLU). Once you have selected your model, it's time to start training!
What is A Large Language Model (Transformer)!
A transformer is a type of large language model (LLM) that uses deep learning algorithms to process natural language. This type of AI has become increasingly popular in recent years due to its ability to generate meaningful and accurate results from text-based data. Large language model transformers are used for tasks such as machine translation, question answering, summarization, and more.
The main components of a large language model transformer include an encoder network and a decoder network which work together to understand the meaning behind words or phrases in natural languages like English or Spanish. The encoder takes input text as input and creates representations called “embeddings” which capture the context within the sentence structure itself rather than just individual words; this allows for better understanding by the model when it comes time for decoding what was said into a useful output like translations or summaries. The decoder then takes these embeddings from the encoder along with other information such as word order rules before finally producing an output response based on all this data combined correctly - usually one that accurately reflects what was originally written by humans!
Large Language Model Transformers have been used successfully across many different applications ranging from chatbots (Here is one of the state-of-art chatbot-related applications of Transformer models) & virtual assistants through medical diagnosis systems up until recently where they've even started being applied towards creating creative works like music compositions & paintings - proving their versatility at tackling any task involving understanding human speech/writing patterns accurately without requiring too much manual intervention beforehand! As more research continues into how best to utilize these powerful tools, we can only expect them to continue growing both in popularity & practical use cases over the coming years ahead so stay tuned if you're interested in seeing how far they'll go next!
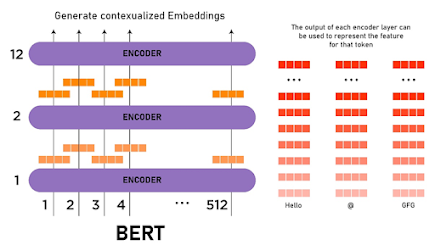
A BERT model Scheme (https://www.geeksforgeeks.org/explanation-of-bert-model-nlp/)
How to Fine-tune a Transformer using Hugging Face and Pytorch
To begin training your Transformer from Hugging Face, there are two main parameters that need tuning: learning rate and batch size. The learning rate determines how quickly the algorithm adapts during each iteration; if it’s too high then it may cause instability in performance while if it’s too low then convergence will take longer than necessary. Batch size defines how many samples are used at once when calculating gradients; larger batches usually lead to faster convergence but also require more memory resources so try experimenting with different values here until you find what works best for you.
Next comes data augmentation - adding additional information into existing datasets by transforming them synthetically through techniques like random cropping/resizing images etc., This helps improve generalization capabilities of our models by providing them more diverse inputs compared to standard datasets alone which lead us towards better results overall due to improved accuracy & robustness despite unseen test cases being presented later down the line during inference stage(testing).
Finally, after all these steps have been taken care of, you’ll want to evaluate & compare results between multiple runs using metrics such as precision, recall & F1 scores. This way allows us to identify areas where improvements should be made within our architecture thus allowing us to increase performance further before pushing it out onto the production environment.
By following these tips above anyone working with Transformers from Hugging Face will be able to set up their own unique configurations tailored specifically towards the problem statement they're trying to solve without having to worry about spending countless hours debugging issues along the way!
With that said let’s dive more into this and select a BERT model and try to fine-tune it.
To fine-tune a BERT transformer model imported from Hugging Face with PyTorch code, you can follow the steps below:
1. Install the Hugging Face transformers package by running pip install transformers in your terminal.
2. Import the required modules, including the transformer model you want to use and the PyTorch library:
from transformers import BertModel, BertTokenizerimport torch
3. Load the pre-trained model by instantiating a new instance of the BertModel class, passing in the desired model name and any additional parameters you want to specify:
model = BertModel.from_pretrained('bert-base-uncased')
4. Next, load the pre-trained tokenizer associated with the model by instantiating a new BertTokenizer and passing in the desired model name:
tokenizer = BertTokenizer.from_pretrained('bert-base-uncased')
5. Prepare your dataset for fine-tuning. This will typically involve preprocessing the text data and converting it into a format that can be used by the transformer model. For example, you can use the tokenizer to encode the text data into a sequence of tokens that can be input to the model:
# Encode the text data using the tokenizerinput_ids = tokenizer.encode(text, add_special_tokens=True)# Convert the input tokens into PyTorch tensorsinput_ids = torch.tensor([input_ids])
6. Set the model to train mode by calling the train() method on the model:
model.train()
7. Use the PyTorch API to define the loss function and optimizer that will be used to train the model. For example:
# Define the loss functionloss_fn = torch.nn.CrossEntropyLoss()# Define the optimizeroptimizer = torch.optim.Adam(model.parameters(), lr=1e-3)
8. Train the model by looping over the training dataset and using the PyTorch API to compute the model's predictions, loss, and gradients with respect to the loss. You will then use the optimizer to update the model's weights based on the computed gradients. This will typically involve defining a training loop that looks something like this:
# Loop over the training datasetfor step, batch in enumerate(train_dataloader):# Unpack the input datainput_ids, labels = batch# Compute the model's predictionsoutputs = model(input_ids)# Compute the lossloss = loss_fn(outputs, labels)# Backpropagate the gradientsloss.backward()# Update the model's weightsoptimizer.step()
9. Repeat the training process for several epochs (or until the model reaches convergence). You can evaluate the model's performance on the validation set at regular intervals to monitor its progress.
I hope this helps! Let me know if you have any other questions.
I hope this helps! Let me know if you have any other questions.
Comments
Post a Comment