

Artificial intelligence is reshaping the world. This technology is changing the way we handle our daily tasks. Deep learning is one method to go toward artificial intelligence and it has so far shown great significance when applied to various areas, from medicine to computer vision. However, deep learning showed also that it can be used to harm or help in fraudulence, depending on how it is applied. One example of this is what is called Generative adversarial learning. In 2016, generative adversarial networks (GANs) were presented to the world, and since then many versions of these networks were developed. A GAN can be defined as a machine learning model that consists of two neural networks competing with each other. These two networks are called generator and discriminator, and each has a different role; one is for generating images from random noise given as input, while the latter is for detecting whether the generated images are real or fake. Finally, this whole process is repeated over a huge number of iterations until the generator becomes good enough to generate images similar to those of the dataset.
In
2018, CyleGAN was proposed by NVIDIA, which is
a modified version of GAN, in which it consists of two generators and two
discriminators that provide image-to-image translation, i.e., transforming
images from domain A to domain B and vice-versa. This network showed great
generalization capability when it was applied to generating realistic fake
human faces. It made everyone feel that there are new humans on this earth.
Moreover, DeepFake technology and other methods
showed that human-like fake faces can be generated and they are hard to be
distinguished from original human faces.
Thus,
there is an urgent need to use deep learning itself to fight another deep
learning method that is used to create humans or faces that do not exist. This
is because these faces can be for bad reasons such as fraudulence. Hence, it is
good to have a deep network that can recognize whether a face is real or
AI-generated.
In
this article, we will provide a deep learning model that is trained to detect
and classify faces into:
- AI-generated faces
- Non AI-generated faces (Real)
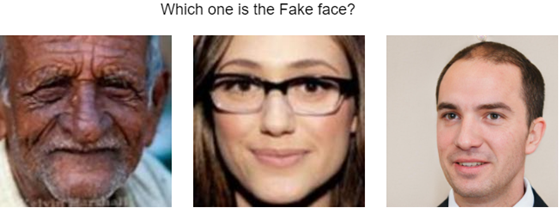
Before we start building a deep learning model for recognizing fake faces, I would like you to look at the figure above and try to find out which face is the fake one. Note that there is only one fake face among the three faces. The aim of this test is to pinpoint the challenge and difficulty of recognizing (by humans) the fake faces generated by powerful deep networks such as GANs.
Deep Learning
for Detecting Fake Faces
Fake face detection is a classification task. A face image must be given to a trained network that would classify it as a real or AI-generated (fake) face. When it comes to classification, we have a lot of options. There are numerous deep networks that are trained on huge datasets such as ImageNet, which provided them with the powerful feature extraction capability that helps in accurate classification, when applied to new targets, in case of transfer learning.
In
this work, we will apply transfer learning as it makes the training faster and
it needs no huge number of training images. We will use the ResNet18 deep network and train it using two different datasets of
real and AI-generated face images. ResNet18 is a pre-trained model that consists
of 18 convolutional layers and it uses skip connections that were proposed in
the residual learning networks. For fine-tuning and testing this network, we
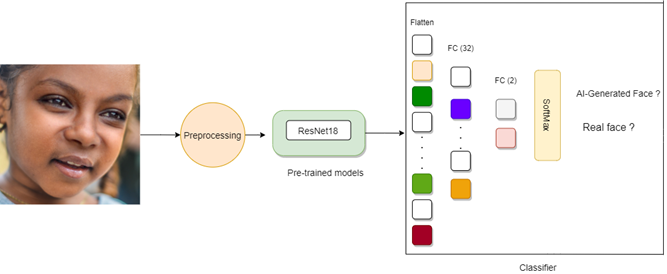
will use the 1 m million fake faces and the UTKFace for fake and real faces, respectively. Figure 2 shows the
process of the transfer learning approach of the ResNet18 that will be trained
to recognize fake faces. As seen, the process consists of 3 main stages. The
first one is to load and preprocess the dataset images, then load the
pre-trained ResNet18 model, and finally reshape it to fit our new
classification task by changing the number of nodes of its final fully
connected (FC) layer to 2, representing Real and Fake faces.
Loading Dataset
The first stage of our work will be to load
and preporcess the dataset images. We will use two datasets and combine them
together to collect as many images as possible, of both real and fake faces.
UTKFaces and 1-millions fake faces will be used for real and fake face images,
respectively. The dataset will be split into training, validation, and testing
sets.
We will use Pytorch deep learning library to
build and fine-tune our model. Hence, let’s first import some dependencies:
from __future__ import print_function, division
import torch
import torch.nn as nn
import torch.optim as optim
from torch.optim import lr_scheduler
import numpy as np
import torchvision
from torchvision import datasets, models, transforms
import matplotlib.pyplot as plt
import time
import os
import copy
Next, we will load our train, validation, and test data
using Dataloaders, and we will use Transforms to resize, normalize and augment
our images. Note that we will resize the images to 128x128x3 pixels and select
a small batch size to lower the computational cost of our system.
# Data augmentation and normalization for training
data_transforms = {
'train':
transforms.Compose([
transforms.Resize(128),
transforms.RandomHorizontalFlip(),
transforms.ToTensor(),
transforms.Normalize([0.485, 0.456, 0.406], [0.229, 0.224, 0.225])
]),
'val':
transforms.Compose([
transforms.Resize(128),
transforms.ToTensor(),
transforms.Normalize([0.485, 0.456, 0.406], [0.229, 0.224, 0.225])
]),
'test':
transforms.Compose([
transforms.Resize(128),
transforms.ToTensor(),
transforms.Normalize([0.485, 0.456, 0.406], [0.229, 0.224, 0.225])
]),
}
data_dir =
r'C:\Users\abdul\Desktop\ContentLab\awwal\data'
image_datasets = {x: datasets.ImageFolder(os.path.join(data_dir,
x),
data_transforms[x])
for x in ['train', 'val','test']}
dataloaders = {x:
torch.utils.data.DataLoader(image_datasets[x], batch_size=4,
shuffle=True, num_workers=0)
for x
in ['train', 'val', 'test']}
dataset_sizes = {x: len(image_datasets[x]) for x in ['train', 'val','test']}
class_names = image_datasets['train'].classes
device = torch.device("cuda:0" if torch.cuda.is_available()
else "cpu")
plt.ion() #
interactive mode
All right then, our model is set now. Let’s
show a sample of our dataset using an imshow function:
def imshow(inp, title=None):
"""Imshow for Tensor."""
inp = inp.numpy().transpose((1,
2, 0))
mean =
np.array([0.485, 0.456, 0.406])
std =
np.array([0.229, 0.224, 0.225])
inp = std * inp
+ mean
inp =
np.clip(inp, 0, 1)
plt.imshow(inp)
if title is not
None:
plt.title(title)
plt.pause(0.001) # pause a bit so that plots are updated
# Get a batch of training data
inputs, classes = next(iter(dataloaders['train']))
# Make a grid from batch
out = torchvision.utils.make_grid(inputs)
imshow(out, title=[class_names[x] for x in classes])
Running the code above will give you a sample of 4 real and fake images as follows:
Note that each time you run this function, new
images will appear as we are randomly shuffling the images.

Loading ResNet18 Model and Weights
The next step after loading the images is to
load the pre-trained model as we are using transfer learning. We will load the
ResNet18 and its corresponding weights and then customize its last fully
connected layer to fit our classification task: fake faces detection. Hence, we
will change the last fully connected layer of this network to have two outputs:
real and fake faces. Moreover, in this part we will also set the loss function
as Crossentropy, and configure the optimizer by setting its type as SGD
(stochastic gradient descent) and the learning rate to 0.001.
model_ft = models.resnet18(pretrained=True)
num_ftrs = model_ft.fc.in_features
# Here the size of each output sample is set to 2.
# Alternatively, it can be generalized to
nn.Linear(num_ftrs, len(class_names)).
model_ft.fc = nn.Linear(num_ftrs, 2)
model_ft = model_ft.to(device)
criterion = nn.CrossEntropyLoss()
# Observe that all parameters are being optimized
optimizer_ft = optim.SGD(model_ft.parameters(), lr=0.001, momentum=0.9)
# Decay LR by a factor of 0.1 every 1 epochs
exp_lr_scheduler = lr_scheduler.StepLR(optimizer_ft,
step_size=1, gamma=0.1)
Training ResNet18 To Recognize Fake Faces
Since ResNet18 is loaded and parameters are set, we can
start fine-tuning our network to classify real and fake faces. For such
purpose, we will create a function that allows early-stopping of the network by
monitoring the validation accuracy. The network will stop training when training
accuracy starts to decrease, and the model of the best accuracy will be saved.
# model
def train_model(model, criterion, optimizer, scheduler,
num_epochs=2):
since = time.time()
best_model_wts
= copy.deepcopy(model.state_dict())
best_acc = 0.0
for epoch in
range(num_epochs):
print('Epoch {}/{}'.format(epoch, num_epochs - 1))
print('-' *
10)
# Each
epoch has a training and validation phase
for phase
in ['train', 'val']:
if phase == 'train':
model.train() # Set model to
training mode
else:
model.eval() # Set model to evaluate mode
running_loss = 0.0
running_corrects = 0
#
Iterate over data.
for
inputs, labels in dataloaders[phase]:
inputs = inputs.to(device)
labels = labels.to(device)
#
zero the parameter gradients
optimizer.zero_grad()
#
forward
#
track history if only in train
with torch.set_grad_enabled(phase == 'train'):
outputs = model(inputs)
_, preds = torch.max(outputs, 1)
loss = criterion(outputs, labels)
# backward + optimize only if in training phase
if phase == 'train':
loss.backward()
optimizer.step()
#
statistics
running_loss += loss.item() *
inputs.size(0)
running_corrects += torch.sum(preds == labels.data)
if
phase == 'train':
scheduler.step()
epoch_loss = running_loss / dataset_sizes[phase]
epoch_acc =
running_corrects.double() / dataset_sizes[phase]
print('{} Loss: {:.4f} Acc: {:.4f}'.format(
phase, epoch_loss, epoch_acc))
# deep
copy the model
if
phase == 'val' and epoch_acc > best_acc:
best_acc = epoch_acc
best_model_wts = copy.deepcopy(model.state_dict())
print()
time_elapsed =
time.time() - since
print('Training
complete in {:.0f}m {:.0f}s'.format(
time_elapsed // 60, time_elapsed % 60))
print('Best val Acc: {:4f}'.format(best_acc))
# load best
model weights
model.load_state_dict(best_model_wts)
return model
Now, we can train
the model by running the above train function. In here, we can select the
number of epochs that we need and call the train function to start fine-tuning.
At first, we will set a number of epochs to 3 and visualize the network’s
performance.
from PIL import ImageFile
ImageFile.LOAD_TRUNCATED_IMAGES =
True
model_ft = train_model(model_ft,
criterion, optimizer_ft, exp_lr_scheduler,
num_epochs=3)
Model Evaluation
The evaluation of a model is done by testing it on
images that were not part of the training and the validation sets. Hence, to test
our model we will use the test set of real and fake images and evaluate its
performance. We will create a function that takes a specific number of images,
pass them to the trained model and show their predicted labels. Note that this
function can also be used to visualize the predicted labels of training or
validation images. In our case, we will use this function to read images from the
testing set and check the results.
def visualize_model(model, num_images=6):
was_training =
model.training
model.eval()
images_so_far =
0
fig = plt.figure()
with
torch.no_grad():
for i,
(inputs, labels) in enumerate(dataloaders['test']):
inputs
= inputs.to(device)
labels = labels.to(device)
outputs
= model(inputs)
_,
preds = torch.max(outputs, 1)
for j
in range(inputs.size()[0]):
images_so_far += 1
ax
= plt.subplot(num_images//2, 2, images_so_far)
ax.axis('off')
ax.set_title('predicted: {}'.format(class_names[preds[j]]))
imshow(inputs.cpu().data[j])
if
images_so_far == num_images:
model.train(mode=was_training)
return
model.train(mode=was_training)


For a more accurate evaluation, we will
read only fake faces and pass them through the model using this function and
check their performance. To do so, we just have to change your test file into
fake faces only. Running the function on fake face images only will let you
discover the power of your model when tested on fake faces.
Wrap up
As we’ve discussed
throughout this article, the power of algorithms like StyleGAN in creating fake
human-like faces raises a lot of questions. On one hand, these faces can help in
various creative applications and technologies such as design and illustration
applications. On the other hand, there are also some drawbacks of such
artificial intelligence technology. Fake human faces can be used for harmful
and hacking purposes such as fraudulence and abuse as we are seeing nowadays when people are using GANs to paste people’s faces on target videos and so
on... Hence, the motivation for this work lies in preventing such abusive and
disturbing actions. We used a simple approach for detecting fake faces,
however, this work can be improved by building a deeper network trained on
millions of real and fake faces in order to have the power of recognizing fake
faces instantly. Such networks could be useful for preventing political
propaganda and influencing campaigns that are getting benefits from fake faces
generated using GANs.
P.S. You can find the dataset and source code of this work on my Github
..............................Stay Tuned for more content ✌✌✌...............................................
Comments
Post a Comment